

Tenons, Theory and Cutting for Timber Doors
If you don't need the theory scroll down to see the door tenon dimensions and cutting technique I'm using.
Door Tenon Design
Starting with the basics, a tenon is a “square peg” that fits in to a mortice “square hole”
So with a tenon on one piece and a mortice in another we have a joint that can only move in one direction. To stop it moving too far in and to keep the joint square, the tenon needs a shoulder.
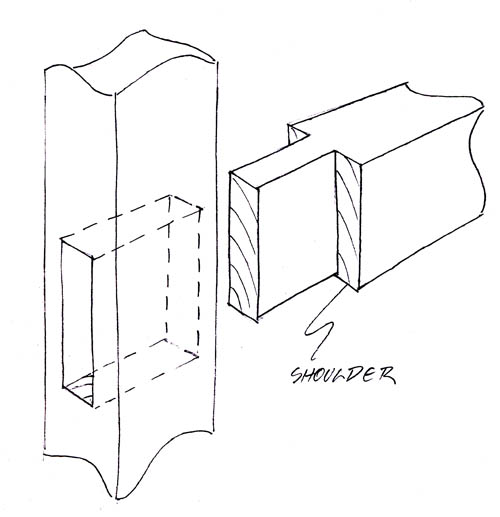
Understanding the importance of the tenon shoulder helps to focus on where accuracy is needed. The rest of joint gives strength and location. Glue, pegs or wedges can help the rest of joint but the shoulder is on it's own. This is why, as you will see in the video, I pay particular attention to this point.
The mortice (hole) should not be wider than about a 1/3 of the timber width. Any wider and the mortice piece is weaker than it needs to be, any thinner and the tenon will be weaker than it needs. The actual size is often determined by the width of the chisel available that is closest a 1/3 of timber. The tenon is then cut to the same size as the mortise.
For a door this simple mortise tenon joint needs complicating slightly in two areas.
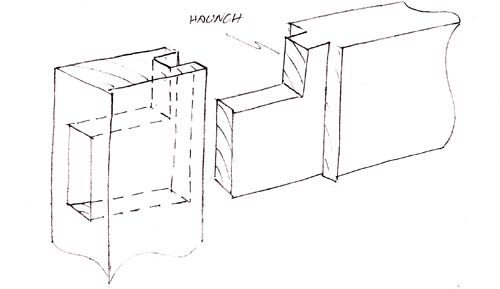
1. Tenons on a Corner.
The top rail and bottom rail join the upright stiles at the corners of the door. So the unmodified joint would look like this.

This joint can be pulled apart in two directions. One direction is under the tenacious force of gravity Glue alone won't hold this joint together, it's easy to imagine how it can move and pull apart. A simple peg through the joint would do the job but not as well as the regular full tenon.
Reducing the height of the tenon and corresponding mortise, brings the joint back to near original strength. By leaving a HAUNCH on the tenon we get back even closer to full strength.
2. Very Long Mortise
The Middle and Bottom rails are deep so the unmodified joint would need a very long mortise.
This long mortise will significantly weaken the stiles. The solution is to cut part of the tenon out so we only need two shorter mortices. Result, a stronger joint.

Door Tenon Theory in to Practice
With the theory behind it I've dimensioned up the door tenons like this:
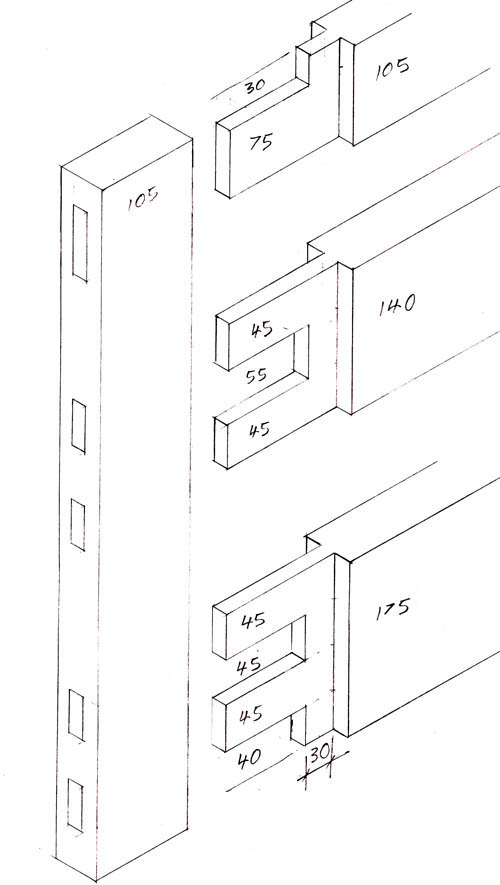
The rails and stiles are 43mm thick so I choose a 5/8inch/15.9mm chisel (closest to 1/3). That determined the thickness of the tenon although you can see from the video I never actually had to measure this.
The tenons can now be cut. The video shows how I do this accurately, getting that shoulder bang on using a router table with a cross slide.
Before I had fancy tools, I used to hand cut them with a hand saw. The method I use now needs minimal marking out and gives me quick and precise mortise and tenon joints.
Next - Marking and cutting mortises followed by wedging
Comments Let us know how you do it! over on the blog
How to Make a Timber Door
Part 1. Timber Exterior Door Design
Part 2. DIY External Door Design and Proportions
Part 3. Tenon Theory and Cutting
Part 4. Mortise Marking and Cutting
Part 5. Fox Wedging Mortise and Tenon Joints
Part 6. Raised Panels on the cheap
Part 7. Routered Mouldings and Fitting